iOS Testing Environment
Apple Developer Program
A provisioning identity associates signing credentials with an Apple developer account. A paid Apple Developer Program membership currently costs USD 99 per membership year (or a local-currency equivalent), but it is not required for basic personal on-device testing: Xcode can create a free Personal Team profile with an Apple Account. Paid membership is required for distribution and additional capabilities.[5]
Xcode can create a free development provisioning profile for personal on-device testing. Open Xcode → Settings (called Preferences in older releases) → Accounts, add the Apple Account, and use Manage Certificates → + → Apple Development when a development certificate is needed. Select the Personal Team for the target, connect the iPhone, unlock it, and accept the separate Trust This Computer pairing prompt before expecting Xcode to deploy the application.[5][8] Then allow Xcode to manage signing. On the device, trust the development profile if prompted under Settings → General → VPN & Device Management (called Profiles & Device Management on some older iOS releases); trusting the computer and trusting the development profile are distinct steps.
On iOS 16+, Developer Mode must also be enabled on the device before locally installed development-signed applications (or apps re-signed with get-task-allow) will run. This option only appears after pairing the device with Xcode or after installing a development-signed app once. The flow is: pair the device, trigger an install from Xcode, then enable Settings —> Privacy & Security —> Developer Mode, reboot, and confirm the prompt after unlock.[2]
Apps do not gain shared keychain access merely because they use the same signing certificate. They must be provisioned with a matching keychain access-group entitlement, and a keychain item can be shared only through a group to which each app belongs.[6]
The provisioning profiles are stored inside the phone in /Library/MobileDevice/ProvisioningProfiles
Modern host-side device tooling
For current iOS testing, the host tooling is increasingly split between:
xcrun simctlfor simulator managementxcrun xctrace list devicesto enumerate simulators and physical devicesxcrun devicectl(Xcode 15+) to interact with paired physical devices from the command line
Useful examples:
# List booted simulators
xcrun simctl list | grep Booted

# List all visible devices/simulators
xcrun xctrace list devices

# List paired physical devices (Xcode 15+)
xcrun devicectl list devices
devicectl is especially useful in automation pipelines where you need to install or launch a test build without opening Xcode:
xcrun devicectl device install app --device <udid> <path_to_app_or_ipa>
xcrun devicectl device launch app --terminate-existing --device <udid> <bundle_id>
Keep Xcode updated when testing iOS 17+ devices. Apple moved developer services to the CoreDevice stack and also changed how Developer Disk Images are handled, so outdated host tooling frequently fails with pairing, image-mounting, or app-launch errors.
Simulator
[!TIP] A simulator is not the same as an emulator. It runs a platform model intended for development and does not reproduce every hardware-backed security property of a physical device.
Simulator
The first thing you need to know is that performing a pentest inside a simulator will much more limited than doing it in a jailbroken device.
All the tools required to build and support an iOS app are only officially supported on Mac OS.
Apple’s de facto tool for creating/debugging/instrumenting iOS applications is Xcode. It can be used to download other components such as simulators and different SDK versions required to build and test your app.
It’s highly recommended to download Xcode from the official app store. Other versions may be carrying malware.
The simulator files can be found in /Users/<username>/Library/Developer/CoreSimulator/Devices
The simulator is still very useful for quickly testing filesystem artifacts, NSUserDefaults, plist parsing, custom URL schemes, and basic runtime instrumentation. However, keep in mind that it doesn’t emulate several physical-device security properties that are often relevant during a pentest, such as the Secure Enclave, baseband, certain keychain access-control behaviours, realistic biometric flows, and jailbreak-specific execution conditions.
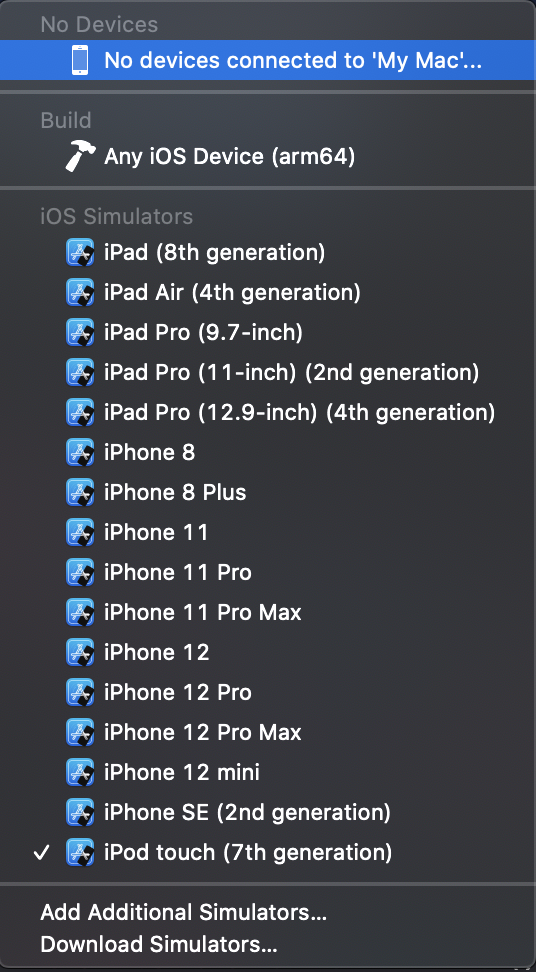
To open the simulator, run Xcode, then press in the Xcode tab —> Open Developer tools —> Simulator
__In the following image clicking in “iPod touch […]” you can select other device to test in:

Applications in the Simulator
Inside /Users/<username>/Library/Developer/CoreSimulator/Devices you may find all the installed simulators. If you want to access the files of an application created inside one of the emulators it might be difficult to know in which one the app is installed. A quick way to find the correct UID is to execute the app in the simulator and execute:
xcrun simctl list | grep Booted
    iPhone 8 (BF5DA4F8-6BBE-4EA0-BA16-7E3AFD16C06C) (Booted)
Once you know the UID the apps installed within it can be found in /Users/<username>/Library/Developer/CoreSimulator/Devices/{UID}/data/Containers/Data/Application
However, surprisingly you won’t find the application here. You need to access /Users/<username>/Library/Developer/Xcode/DerivedData/{Application}/Build/Products/Debug-iphonesimulator/
And in this folder you can find the package of the application.
Emulator
Corellium is a commercial virtual iOS environment commonly used for mobile security research. It offers virtual jailbroken and non-jailbroken iOS devices, cloud trials, and multiple product/deployment options.[7] Older descriptions of it as a per-user SaaS product with no trial are now obsolete, and it should not be described as the only publicly available iOS virtualization option.
No Jailbreak needed
Check this blog post about how to pentest an iOS application in a non jailbroken device:
Ios Pentesting Without Jailbreak
Jailbreaking
Apple strictly requires that the code running on the iPhone must be signed by a certificate issued by Apple. Jailbreaking is the process of actively circumventing such restrictions and other security controls put in places by the OS. Therefore, once the device is jailbroken, the integrity check which is responsible for checking apps being installed is patched so it is bypassed.
[!TIP] Unlike Android, you cannot switch to “Developer Mode” in iOS to run unsigned/untrusted code on the device.
Android Rooting vs. iOS Jailbreaking
While often compared, rooting on Android and jailbreaking on iOS are fundamentally different processes. Rooting Android devices might involve installing the su binary or replacing the system with a rooted custom ROM, which doesn’t necessarily require exploits if the bootloader is unlocked. Flashing custom ROMs replaces the device’s OS after unlocking the bootloader, sometimes requiring an exploit.
In contrast, iOS devices cannot flash custom ROMs due to the bootloader’s restriction to only boot Apple-signed images. Jailbreaking iOS aims to bypass Apple’s code signing protections to run unsigned code, a process complicated by Apple’s continuous security enhancements.
Jailbreaking Challenges
Jailbreaking iOS is increasingly difficult as Apple patches vulnerabilities quickly. Downgrading iOS is only possible for a limited time after a release, making jailbreaking a time-sensitive matter. Devices used for security testing should not be updated unless re-jailbreaking is guaranteed.
iOS updates are controlled by a challenge-response mechanism (SHSH blobs), allowing installation only for Apple-signed responses. This mechanism, known as a “signing window”, limits the ability to store and later use OTA firmware packages. The IPSW Downloads website is a resource for checking current signing windows.
Jailbreak Varieties
- Tethered jailbreaks require a computer connection for each reboot.
- Semi-tethered jailbreaks allow booting into non-jailbroken mode without a computer.
- Semi-untethered jailbreaks require manual re-jailbreaking without needing a computer.
- Untethered jailbreaks offer a permanent jailbreak solution without the need for re-application.
Jailbreaking Tools and Resources
Jailbreaking tools vary by iOS version and device. Resources such as Can I Jailbreak?, The iPhone Wiki, and Reddit Jailbreak provide up-to-date information. Examples include:
- Checkra1n for older A7-A11/iOS 12-14 era research devices.
- Palera1n for checkm8-compatible devices (A8-A11) on iOS/iPadOS 15+.
- Dopamine for many arm64/arm64e devices on iOS 15/16 using a modern rootless jailbreak.
- Unc0ver remains relevant mainly for older iOS versions up to 14.8.
Modifying your device carries risks, and jailbreaking should be approached with caution.
Rootless jailbreaks
Modern iOS 15+ jailbreaks are commonly rootless instead of rootful. From a tester perspective, this matters because a lot of older guides still assume that jailbreak files live directly under / or /Library/..., which is no longer true on many current setups.
- Rootless jailbreaks avoid modifying the sealed system volume directly.
- On palera1n, jailbreak files are typically stored under a randomized path in
/private/preboot/...and exposed through the stable symlink/var/jb.[3] - Tweaks, launch daemons, and helper binaries might therefore exist under
/var/jbinstead of the legacy rootful locations.
This has a direct impact on environment validation, Frida setup, and jailbreak detection bypass:
- When checking whether your tooling installed correctly, inspect both legacy paths and
/var/jb. - When reviewing jailbreak detection logic in an app, remember that modern checks often look for rootless artifacts and symlinks in addition to classic indicators like
Cydia.app. - If a third-party script or tweak assumes a rootful filesystem layout, it may fail silently on a rootless device.
Jailbreaking Benefits and Risks
Jailbreaking expands the tester’s access and permits unsigned tooling or tweaks, but it does not automatically remove the sandbox from every ordinary app. Filesystem access depends on the jailbreak environment, the process’s entitlements, and any injected tooling. Jailbreaking also introduces security and stability risks.
After Jailbreaking
Jailbreak Detection
Several applications will try to detect if the mobile is jailbroken and in that case the application won’t run[1]
- After jailbreaking an iOS files and folders are usually installed, these can be searched to determine if the device is jailbroken.
- In modern rootless jailbreaks, those files may appear under
/var/jbor resolve through symlinks into/private/preboot/...instead of only in classic rootful locations. - In a jailbroken device applications get read/write access to new files outside the sandbox
- Some API calls will behave differently
- The presence of the OpenSSH service
- Calling
/bin/shwill return 1 instead of 0
More information about how to detect jailbreaking here.[4]
Jailbreak Detection Bypass
- You can try to bypass these detections using Objection’s
ios jailbreak disablecommand. - You could also install the tool Liberty Lite (https://ryleyangus.com/repo/). Once the repo is added, the app should appear in the ‘Search’ tab
References
- [1] iOS Security Testing - OWASP MASTG
- [2] Enabling Developer Mode on a Device - Apple Developer Documentation
- [3] palera1n v2.0.1 release notes – rootless preboot and
/var/jb - [4] Jailbreak Detection Methods
- [5] Apple Developer – Choosing a Membership
- [6] Apple Developer – Configuring keychain sharing
- [7] Corellium Support – General FAQs
- [8] Apple Support – About the “Trust This Computer” alert