iOS Burp Suite Configuration
Installing the Burp Certificate on iOS Devices
For secure web traffic analysis and SSL pinning on iOS devices, the Burp Suite can be utilized either through the Burp Mobile Assistant or via manual configuration. Below is a summarized guide on both methods:
Automated Installation with Burp Mobile Assistant
The Burp Mobile Assistant simplifies the installation process of the Burp Certificate, proxy configuration, and SSL Pinning. Detailed guidance can be found on PortSwigger’s official documentation.[7]
Manual Installation Steps
- Proxy Configuration: Start by setting Burp as the proxy under the iPhone’s Wi-Fi settings.
- Certificate Download: Navigate to
http://burpon your device’s browser to download the certificate. - Certificate Installation: Install the downloaded profile via Settings > General > VPN & Device Management, then enable trust for the PortSwigger CA under Certificate Trust Settings.
Configuring an Interception Proxy
The setup enables traffic analysis between the iOS device and the internet through Burp, requiring a Wi-Fi network that supports client-to-client traffic. If unavailable, a USB connection via usbmuxd can serve as an alternative. PortSwigger’s tutorials provide in-depth instructions on device configuration and certificate installation.[8][9]
Transparent Proxying via OpenVPN + iptables REDIRECT
If the target app ignores the configured HTTP proxy, an alternative is to place the iOS device behind a researcher-controlled VPN gateway and transparently redirect the traffic into Burp or mitmproxy.[3]
This is not a certificate pinning bypass by itself. It only solves the network plumbing so the device traffic reaches your interception proxy without configuring a per-app or per-device proxy. If the app performs real certificate pinning, HTTPS decryption will still fail until pinning is bypassed separately.
Typical flow:
- Run an OpenVPN server on a Linux host and connect the iOS device so its traffic arrives on
tun0. - Bind Burp or
mitmproxyto the VPN listener IP on port8080. - Enable invisible proxying in Burp because redirected clients are not proxy-aware and will talk as if they were connecting directly to the destination.[4]
- Redirect TCP
80and443arriving ontun0to the local proxy listener. - Add a
POSTROUTINGMASQUERADE rule on the egress interface so proxied traffic can leave the gateway and replies return through the VPN. - Install and trust the interception proxy CA on the iOS device so apps that rely only on the system trust store accept the generated leaf certificates.
Example rules:
# Redirect VPN client traffic into the local interception proxy
iptables -t nat -A PREROUTING -i tun0 -p tcp --dport 80 -j REDIRECT --to-ports 8080
iptables -t nat -A PREROUTING -i tun0 -p tcp --dport 443 -j REDIRECT --to-ports 8080

# Allow VPN client traffic to egress back to the Internet
iptables -t nat -A POSTROUTING -s 10.8.0.0/24 -o eth0 -j MASQUERADE
Notes:
- This is useful when you want forced interception without changing the target app or configuring an explicit proxy in iOS Wi-Fi settings.
- Redirecting
443to Burp only works for apps that trust the installed CA or for apps where TLS validation / pinning has already been bypassed. - The upstream repository example script takes an IP and appends
/24in thePOSTROUTINGrule. In practice, use the actual VPN client subnet instead of assuming a fixed/24. - If you use Burp, enable Proxy —> Options —> Edit listener —> Request handling —> Support invisible proxying.
mitmproxycan be used in the same layout if it is bound to the VPN listener IP and transparent-mode requirements are satisfied.
Transparent Proxying via MikroTik RouterOS dst-nat
If you control the wireless router, you can transparently force a test phone, tablet, or IoT device through Burp without configuring a manual proxy on the client. This is useful when the app ignores system proxy settings, is not proxy-aware, or the device does not expose any proxy configuration at all.[5]
This is still not a certificate pinning bypass. It only forces the TCP flow through Burp. HTTPS interception still requires the Burp CA to be trusted by the device, and pinned apps will still reject the MITM until pinning is bypassed separately.
Typical layout:
- The MikroTik hosts the test Wi-Fi and provides Internet access.
- The tester laptop joins the same Wi-Fi and runs Burp on its LAN IP (for example
192.168.23.10:8123). - The target device also joins that Wi-Fi and is added to a RouterOS address list such as
Proxy me!. - A
dstnatrule redirects the selected client’s TCP80,443traffic to the Burp listener. - A second NAT rule masquerades traffic destined to the Burp listener so RouterOS connection tracking keeps the return path stable.
- If the device has IPv6 connectivity, block or separately intercept IPv6, otherwise it may bypass your IPv4-only NAT rules.
Burp listener requirements:
- Bind the listener to the laptop LAN IP on the MikroTik network, not only to
127.0.0.1. - Enable Support invisible proxying because redirected clients are not sending explicit proxy requests.[4]
Example RouterOS rules:
# Address list entry (can be kept disabled until needed)
/ip firewall address-list add list="Proxy me!" address=192.168.23.50 comment="iPad" disabled=yes

# Redirect HTTP/HTTPS from listed clients into Burp
/ip firewall nat add chain=dstnat src-address-list="Proxy me!" protocol=tcp dst-port=80,443 action=dst-nat to-addresses=192.168.23.10 to-ports=8123

# Masquerade packets sent to Burp so replies map back to the original client
/ip firewall nat add chain=srcnat protocol=tcp dst-address=192.168.23.10 dst-port=8123 action=masquerade
Operational notes:
- Enabling/disabling the address-list entry becomes a one-click interception toggle.
- This works well for plain HTTP, HTTPS apps that trust your CA, non-proxy-aware apps, and low-level OS traffic that would normally miss a manually configured proxy.
- This only catches traffic matching the NAT rule. If the app moves to QUIC/UDP, other TCP ports, or IPv6, add blocking or extra interception rules as needed.
Automating the RouterOS toggle via REST API
RouterOS exposes a REST API on the management web server, so the interception toggle can be scripted.[6] A practical pattern is to identify the address-list entry by its comment and then patch its disabled property.[5]
ID=$(curl -s -u admin:yourpass \
  -X GET 'https://192.168.23.1/rest/ip/firewall/address-list' \
  -H 'Content-Type: application/json' \
  | jq -r '.[] | select(.comment == "iPad") | .[".id"]')

curl -k -u admin:yourpass \
  -X PATCH "https://192.168.23.1/rest/ip/firewall/address-list/$ID" \
  -H 'Content-Type: application/json' \
  --data '{ "disabled": "false" }'
This makes it easy to wire the toggle into a shell script, hotkey, hardware button, or test harness.
Flutter iOS apps that ignore the system proxy
Some Flutter-based iOS applications do not send traffic through the usual iOS Wi-Fi proxy settings because their networking lives inside Dart HttpClient / BoringSSL instead of the common native NSURLSession stack. In that situation, installing the Burp CA and configuring the Wi-Fi proxy can fail even on non-jailbroken devices.[1]
A practical workaround is to move interception below the app proxy layer and force the traffic through a VPN-style proxy app (for example, Potatso) that forwards device traffic to Burp. This recovers visibility when the app bypasses the explicit proxy configuration, but it is still not a universal certificate-pinning bypass: if the Flutter app performs hardcoded certificate/public-key validation, you will still need patching or instrumentation.
Typical workflow:
-
First try the normal iOS Wi-Fi proxy + trusted Burp CA setup.
-
If the Flutter app still does not appear in Burp, create a manual HTTP proxy profile in Potatso pointing to your Burp listener:
Type: HTTP Host: <Burp listener IP> Port: <Burp listener port> -
Connect the device through that Potatso profile so traffic is routed via the VPN/network layer instead of relying on the app to honor iOS proxy settings.
-
In Burp, enable Proxy —> Options —> Edit listener —> Request handling —> Support invisible proxying on that listener.[4]
-
Relaunch the target Flutter app and confirm whether requests now reach Burp.
Notes:
- This is mainly useful for Flutter apps that ignore the explicit system proxy; it complements, but does not replace, CA installation and classic SSL-pinning bypasses.
- Potatso currently supports manual HTTP(S)/SOCKS-style upstream proxy definitions and, per the App Store listing used for this note, requires iOS 17.0 or later.[2]
- If the target device runs an older iOS release, the technique still applies conceptually with any equivalent VPN-based transparent forwarding tool that can send device traffic to Burp/mitmproxy.
- Burp invisible proxying matters here because the traffic is transparently redirected, so the client is not behaving like a normal proxy-aware browser.
Advanced Configuration for Jailbroken Devices
For users with jailbroken devices, SSH over USB (via iproxy) offers a method to route traffic directly through Burp:
-
Establish SSH Connection: Use iproxy to forward SSH to localhost, allowing connection from the iOS device to the computer running Burp.
iproxy 2222 22 -
Remote Port Forwarding: Forward the iOS device’s port 8080 to the computer’s localhost to enable direct access to Burp’s interface.
ssh -R 8080:localhost:8080 root@localhost -p 2222 -
Global Proxy Setting: Lastly, configure the iOS device’s Wi-Fi settings to use a manual proxy, directing all web traffic through Burp.
Full Network Monitoring/Sniffing
Monitoring of non-HTTP device traffic can be efficiently conducted using Wireshark, a tool capable of capturing all forms of data traffic. For iOS devices, real-time traffic monitoring is facilitated through the creation of a Remote Virtual Interface, a process detailed in this Stack Overflow post.[10] Prior to beginning, installation of Wireshark on a macOS system is a prerequisite.
The procedure involves several key steps:
- Initiate a connection between the iOS device and the macOS host via USB.
- Ascertain the iOS device’s UDID, a necessary step for traffic monitoring. This can be done by executing a command in the macOS Terminal:
$ rvictl -s <UDID>
Starting device <UDID> [SUCCEEDED] with interface rvi0- Post-identification of the UDID, Wireshark is to be opened, and the “rvi0” interface selected for data capture.
- For targeted monitoring, such as capturing HTTP traffic related to a specific IP address, Wireshark’s Capture Filters can be employed:
Burp Cert Installation in Simulator
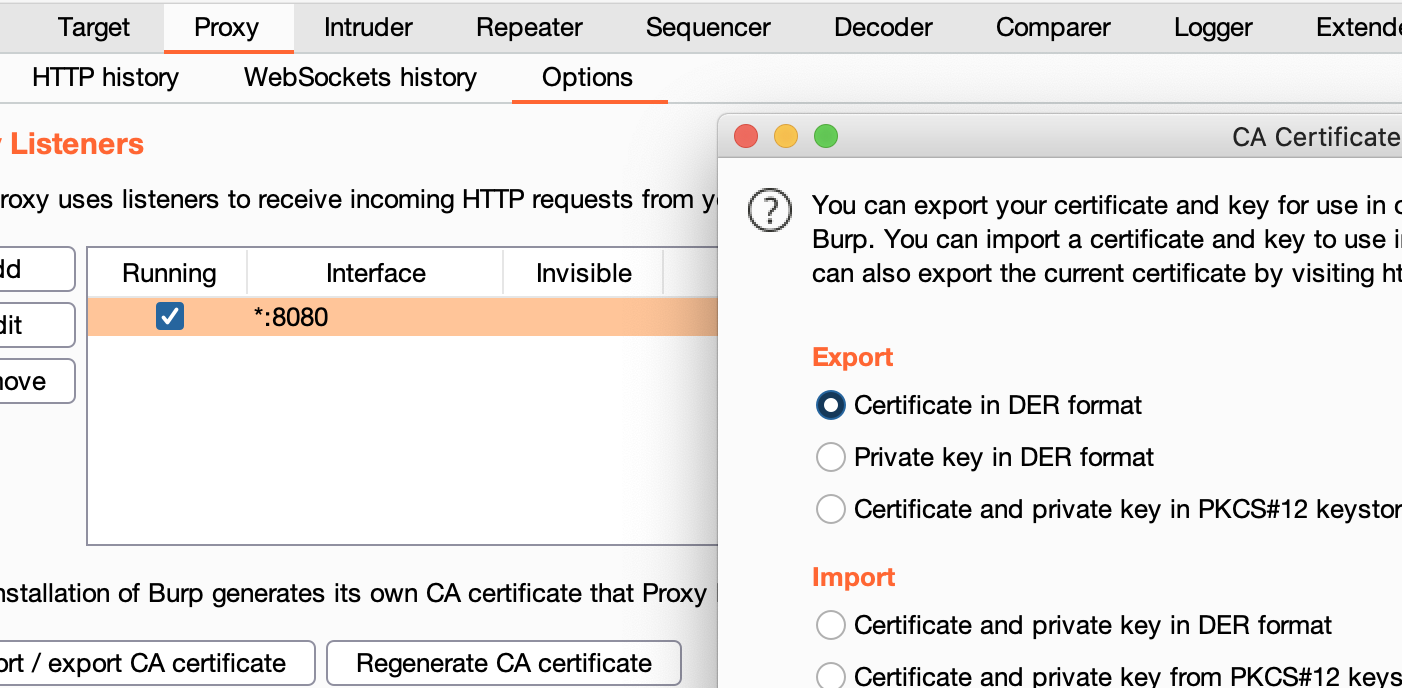
- Export Burp Certificate
In Proxy —> Options —> Export CA certificate —> Certificate in DER format
- Drag and Drop the certificate inside the Emulator
- Inside the emulator go to Settings —> General —> Profile —> PortSwigger CA, and verify the certificate
- Inside the emulator go to Settings —> General —> About —> Certificate Trust Settings, and enable PortSwigger CA
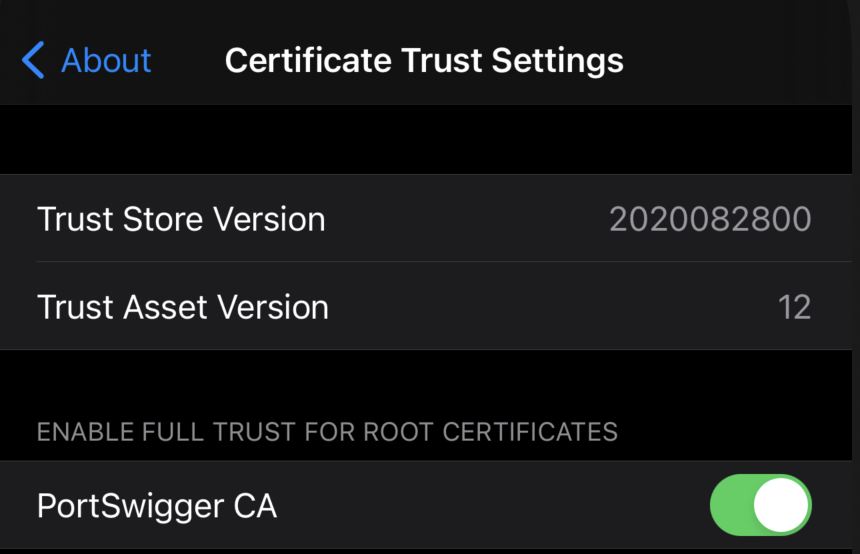
Congrats, you have successfully configured the Burp CA Certificate in the iOS simulator
[!TIP] The iOS simulator will use the proxy configurations of the MacOS.
MacOS Proxy Configuration
Steps to configure Burp as proxy:
- Go to System Preferences —> Network —> Advanced
- In Proxies tab mark Web Proxy (HTTP) and Secure Web Proxy (HTTPS)
- In both options configure 127.0.0.1:8080
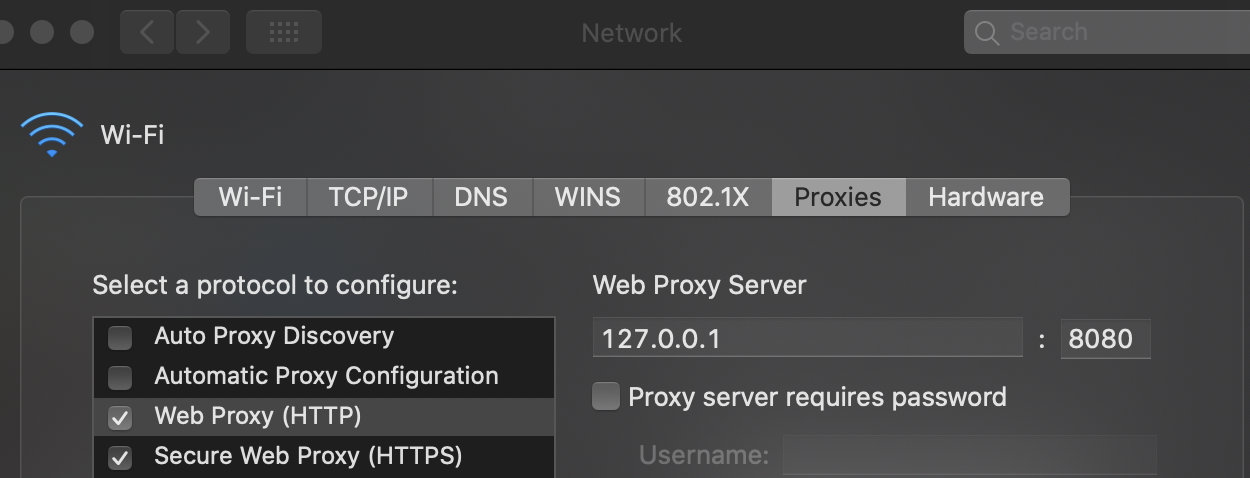
- Click on Ok and the in Apply
References
- [1] Bypassing SSL Pinning in Flutter-Based iOS Applications
- [2] Potatso App Store listing
- [3] SSL Pinning Bypass for iOS — iptables
- [4] Invisible proxying - PortSwigger
- [5] Mobile device interception with MikroTik
- [6] MikroTik RouterOS REST API
- [7] Installing Burp’s CA certificate with the Burp Mobile Assistant - PortSwigger
- [8] Configuring an iOS device to work with Burp - PortSwigger
- [9] Installing Burp’s CA certificate in an iOS device - PortSwigger
- [10] Capturing mobile phone traffic on Wireshark - Stack Overflow